The Cherry Audio 8-Step Sequencer is a fast and easy-to-use sequencer that can used not only for playing melodic sequences, but also as a modulation source for filters, amps, and more.
If you're not familiar with using step sequencers, the step sequencer concept is the forerunner of modern MIDI DAW software; the basic idea is that each step outputs a pitch and gate CV, making it act as a sort of "player piano" for melodies or CV control signals. Eight steps (i.e. notes) may not seem like much, but step sequencers can be used for a variety of applications and are highly useful for pattern-based music and modulation.
Inputs, Outputs, and Controls
Transport Section
The top area of the module is analogous to standard tape deck-style transport controls.
Stop button and CV jack- Stops sequencer from running. The Stop button can be activated via CV using the jack below the button with any trigger or gate CV greater than +2.5 volts.
Start and CV jack- Starts sequencer running. The Start button can be activated via CV using the jack below the button with any trigger or gate CV greater than +2.5 volts.
Step- Advances current position to the next step. This is useful for setting pitches for each stage when the sequencer is stopped. The advance button also works when the sequencer is in play mode. Note that we didn't include a CV jack for step advance- the Ext Clk jack does exactly this.
Play Trig- The Play Trigger jack outputs a 5V trigger spike any time play mode is initiated (from the Start button or via CV control). This can be useful for starting ganged multiple sequencers and other functions.
Reset- This input jack is really important for locking sequencer timing to a DAW project or other sequencers. It force-resets the sequencer to the very beginning of step 1 the instant it receives a gate or trigger voltage.
If you're syncing to a DAW, route the IO Panel Play jack to the Reset input; if you're slaving to another sequencer, route the master sequencer's Play Trig out to the slave's Reset input.
And since we're getting hot 'n' heavy with all this clock talk, a quick primer on clock and sync signals would be er, timely:
Clocks: Not just a sappy song by Coldplay- It's very important to clearly understand how clock signals work with step sequencers, so don't skim this section! One clock tick (i.e., a single voltage spike) equates to one sequencer step. If the clock signal was 120 clicks-per-minute, the sequencer would step 120 times a minute.
Can I just use the Sync Out jack on the IO Panel to sync the sequencer to a DAW? It says Sync right on it!- You can, but not directly, so don't plug the IO Panel Sync Out jack into the sequencer Ext Clock (unless you like really fast music) . Sync and Clock signals are different - keep on reading...
What's the difference between Clock and Sync signals?- Clock signals are explained above. To summarize, clock signals are the what-you-hear-is-what-you-get of timing signals: one click = one sequencer step advance. Sync signals are also a series of clicks, but they run MUCH faster and are intended to be subdivided down to musical note values via a Sync Divider module. They're typically expressed in pulses per-quarter-note, usually abbreviated to the catchy acronym, "PPQN." Voltage Modular's IO Panel Sync Out jack uses the common rate of 96 PPQN, with the actual speed of the pulses varying dependent upon the DAW host project tempo. The IO Panel Sync Out jack, along with a Sync Divider module, is the key to precisely syncing Voltage Modular sequencers to a DAW project. (If you're running Voltage Modular in standalone mode, the Sync Generator module can be used in place of the IO Panel Sync Out jack.)
I'm just reading, why are you making up all these fictional questions, weirdo?- Hey, we're just trying to help. No need to get snippy.
Ext Clk button and CV jack- Clicking the Ext toggle button disconnects the 8 Step Sequencer's internal clock and accepts clock signals from Ext Clk jack. Note that the 8 Step Sequencer isn't too fussy about external clock sources; pretty much anything that creates rapid (or not-so-rapid) pulses can be used, including LFO's, oscillators, or even the gate or trigger output of another sequencer. Along these lines, note that external clock pulses don't have to consistently repeat either; any pattern of pulses can drive the sequencer Ext Clk input.
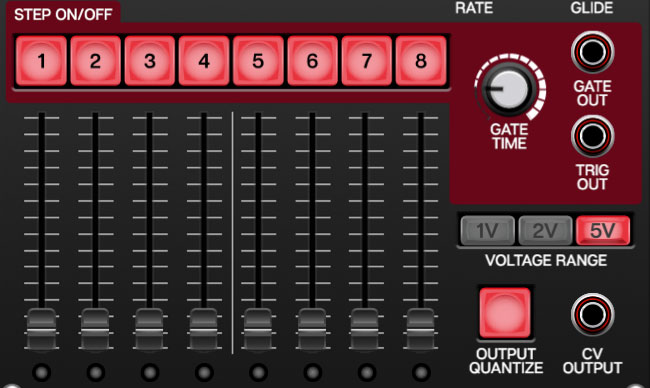
Num Of Steps and numeral display- These up/down buttons set the total number of sequencer steps from 2 - 8 steps. This defaults to 8 steps and can be altered with the sequencer in stop or play mode.
Rate and LED indicator- Sets the speed of the 8 Step Sequencer's internal clock from around 4 - 450 bpm. The LED indicator flashes with each "click" or step advance. The 8 Step Sequencer's Rate pop-up tooltip is calibrated to display tempos based on sixteenth-notes. For example, setting the Rate knob to 120 bpm plays 480 notes a minute (we did this because you'll likely want to play fast tempos such as this, and it's sort of kooky to set the knob to "480 bpm" just to get sixteenth-notes). External clock signals can used if faster or slower speeds are needed.
CV Offset- This input jacks lets you add or subtract overall voltage from the sequencer's output. Most commonly this would be used to transpose the key of a sequence during playback (from a keyboard CV, or another synced sequencer running at a slower rate), but it can also be used for more esoteric applications, such as routing an LFO to continuously vary the pitch of the entire sequence.
Glide- The Glide control causes notes to slide from one pitch to the next, as opposed to discretely jumping from one pitch to the next. Higher settings create a slower glides. Glide speed is not affected by the overall sequence rate; in other words, glide times between notes remain constant regardless of tempo.
Step and CV Slider Section
The bottom area sliders and buttons define how each sequencer step behaves. This is where the magic happens!