The Cherry Audio Arpeggiator is a classic "vintage-style" arpeggiator. In case you're wondering, an arpeggiator is basically a step sequencer that takes a chord as its input, and plays each note of the chord individually in an ascending or descending pattern over one or more octaves.
This module uses its polyphonic MIDI input jack to receive chords from a keyboard or DAW and convert them into a monophonic series of notes which are output as CV/gate signals. The rate at which the pattern is played can be set on the module or synced to an external clock source.
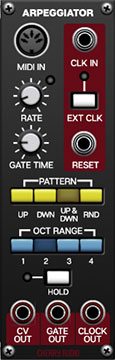
Inputs, Outputs and Controls
MIDI In jack- This MIDI input jack receives polyphonic pitch and note on/off messages from a MIDI controller or host DAW. Typically this will be connected to the MIDI From Host output on the I/O panel.
Rate- Sets the rate of the arpeggiator when it is not synced to an external clock source.
Gate Time- Sets the length of the 5V gate signal from 1 - 500ms for each step of the arpeggio pattern. The gate signal will be output at the Gate Out jack.
Clk In jack- This input jack can be used to sync the arpeggiator to an external clock source such as a sequencer or your DAW host. Typically the clock output from a module such as the Sync Divider is sent to this input jack but any signal can be used. The pattern will advance any time the input signal transitions from below 2.5V to 2.5V or higher.
To sync the Arpeggiator to your DAW host, connect the Sync Out and Play jacks from the Transport section of the I/O panel to a Sync Divider module’s Sync In and Reset jacks respectively. Then connect the Clock Out jack from the Sync Divider to the Clk In jack of the Arpeggiator and engage its Ext Clk button.
Pro Tip: To create a “swing” or “shuffle” feel, set the Sync Divider to 8th notes and send its clock output into a Delay module. Set the delay to 100% wet and 0% feedback and patch its output into the same Clk In jack of the Arpeggiator. The timing of the delayed signal can be adjusted to create a swung 16th note between the 8th notes.
Ext Clk- Engaging this button overrides the module’s internal clock and allows the signal sent to the Clk In jack to externally control the rate of the arpeggiator.
Reset- This jack is used to force the module’s internal clock to restart immediately when a signal of 2.5V or higher is received. Note that this will restart the clock, but not the arpeggiator pattern. The pattern is only reset once all keys in the chord are released and a new MIDI note or chord is played.
Pattern- These buttons select the order in which the notes of the chord will be played. Up plays the notes in order from lowest to highest, Dwn from highest to lowest, Up&Dwn will play the notes from lowest to highest then back to lowest again (the highest and lowest note will be played twice in a row) and Rnd will randomly cycle through the notes.
Hold- While engaged the arpeggiator will continue to run without having to continuously hold down keys. This allows you to play a series of chords without the arpeggiator stopping as you release keys between chords. Be aware that it will not stop until you disengage the button again. Mapping this to a sustain pedal or button on a MIDI controller could be useful for conveniently toggling this on and off.
Oct Range- Selects how many octaves the pattern will be played at before repeating.
CV Out jack- This is the output for the arpeggiated pitch CV. Typically this will be patched to the Keyb CV input of an oscillator to make the oscillator’s pitch step through the notes of the chord being played but can also be used to control a filter’s cutoff frequency or anything else with a CV input.
Gate Out jack- Outputs 5V gate signals for each step of the arpeggio pattern. Usually this will be patched to the gate input of an envelope generator whose output is patched to the CV input of an amplifier (VCA).
Clock Out jack- Outputs the clock signal of the arpeggiator. This is particularly useful for syncing other modules to the arpeggiator when using its internal clock.