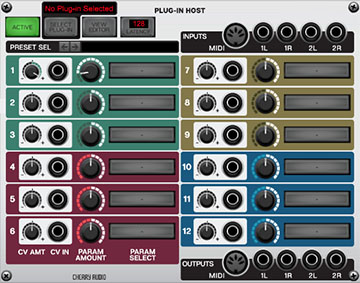
The Plug-In Host module lets you use almost any virtual instrument or effect plug-in "inside" of Voltage Modular and allows CV control of up to 12 plug-in parameters. It includes four audio ins and outs as well as MIDI I/O.
In this guide, we'll interchangeably refer to virtual instruments and effects plug-ins simply as "plug-ins" to save me some typing and you some reading.
The Big Disclaimer
We've tested Plug-In Host with many plug-ins, and in most cases, it performs fabulously well, but be aware that not all plug-ins will play nice with it.
If individual plug-ins use a shell host, you may not be able to load them. The most common of these are Waves plugs, and they should work fine.
Controls for some plug-ins won't appear in the Parameter Select menu.
Because some developers use non-standard preset browsers, presets may not appear in the Preset Select window.
If you're using Softube instruments or plug-ins on a Mac, the VST versions will crash (it's them, not us, baby), but AU versions work fine, even if you're using a DAW that doesn't inherently support AU plugs (because you're hosting them in Plug-In Host, not the DAW itself).
Some plug-ins may crash our system, but we're continually working to improve third-party plug-in support.
Top Buttons
Active- This is the "on/off" switch. Green is on, gray is off. In off mode, virtual instruments won't make any sound, and plug-ins will pass signals unaffected.
Select Plug-In- Use this to choose an instrument or effect. When clicked, you'll see a sub-menu with instrument and effects types (Audio Units, VST, VST3 - depending on whether you're using Windows or OS X). Choosing the desired type will automatically navigate to the appropriate folder where plug-ins can be selected.
View Editor- Opens the editor window for the selected instrument or plug-in. Edit windows can be closed by clicking the View Editor button again or by clicking the X in the top-left corner of the plug.
Latency- Just like the audio latency setting in DAWs, lower settings result in quicker processing and snappier performance, but require more computer processing power. As with audio hardware, the general rule is to set this as low as possible until you start hearing crackling noises, but the default setting of 128 samples should work well for most applications.
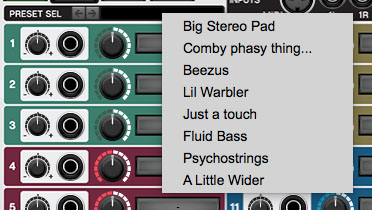
Preset Select- The left/right arrow buttons can be used to cycle through a plug-in's presets. Clicking in the black area to the right of the selection arrows also opens a pop-up menu displaying all presets for the plug-in.
Please keep in mind that presets won't be visible if the plug-in developer uses a proprietary preset browser implementation; presets will only be displayed if the plug-in uses the standard Windows or OS X plug-in preset browser.
Inputs
MIDI- You'll typically play virtual instruments by patching the I/O Panel MIDI From Host MIDI output to the Plug-In Host MIDI input jack.
If you'd like to play a virtual instrument using CV's from a sequencer or other source within Voltage, use the CV To MIDI module (or the CV To MIDI CC Converter for transmitting MIDI CC data).
Audio Inputs- Use these for routing audio into an effects plug-in. Usually the 1L and 1R inputs are all you'll need, but we've provided a second set of inputs as well.
Outputs
MIDI- A MIDI out for plug-ins that use it, typically arpeggiators and some virtual instruments with on-screen keyboards.
Audio Outputs- The plug-in's audio outs. A second set of outputs is included for multi-out instruments and plug-ins.
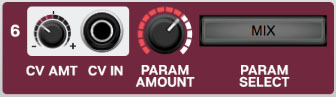
Parameter Control Slots
We've arrived at the fun part! Not only do these allow 12 plug-in parameters to be "remote-controlled," but each slot includes a CV in jack and bipolar attenuator. This allows CV control of any parameter of any plug-in, which is kind of awesome.
CV Amount knob - Attenuates and/or inverts incoming control voltages. Center position is zero. Turning the knob right applies positive voltage, turning the knob to the left applies negative voltage.
CV In jack - Patch incoming CV's to this jack.
Parameter Amount - Sets the initial amount for mapped plug-in parameters. Once mapped, it acts as a "remote control" for the selected parameter, but keep in mind that that it only communicates one way, i.e. moving the control in the plug-in's interface will not move the Parameter Amount knob, but moving the Parameter Amount knob will move the control in the plug-in interface.
Parameter Select button - Click this to assign plug-in parameters to control slots. A single mouse click displays all of the plug-in's parameters; clicking on one assigns it. Parameters can also be assigned using Plug-In Host's Learn function.
To learn a control, select Learn from the pop-up menu (if the plug-in editor window is currently hidden, the menu will say View Editor and Learn; this initiates learn mode and opens the plug-in editor window). The Parameter Select button will say LEARNING in red; simply move the control you'd like to assign in the plug-in interface to instantly assign it to the current control slot. Learn mode will automatically disengage.
Learning vs. direct assignment: Generally speaking, for plug-ins with a just a few parameters, it's fastest to assign controls by simply clicking the Parameter Select button and clicking the desired parameter, but for plug-ins with dozens of parameters, Learn mode greatly simplifies parameter assignment.
To clear control assignments and intialize a parameter control slot, click the Parameter Select and choose None.