Mighty Piano Roll is a full-function piano roll-type sequencer, similar to piano roll editors commonly seen in DAW editors. Not only does it allow graphic drawing and editing of note sequences, it's fully polyphonic, and supports independent MIDI channel assignment for each note.
In this guide, we'll interchangeably refer to Mighty Piano Roll as "MPR" (so don't confuse it with that homely Mazda car-van thing.)
Many of Mighty Piano Roll's functions have QWERTY keyboard shortcuts - these are indicated in [brackets] next to the function name.
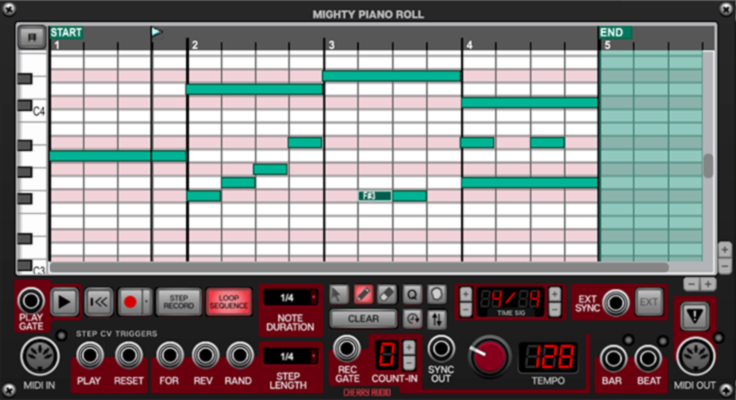
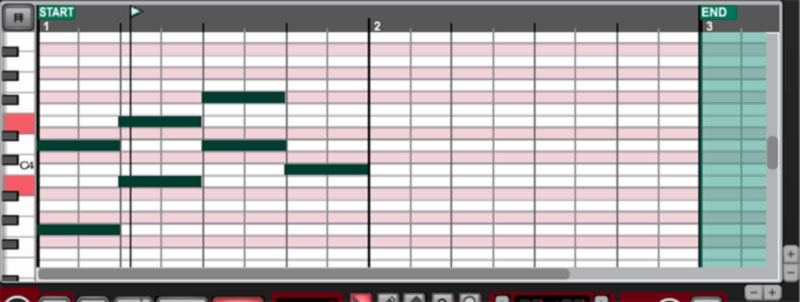
Sequence Grid Window
This is where all notes are displayed, drawn, recorded, sliced, diced, etc. The sequence grid displays pitch vertically from low to high and covers the entire MIDI note range. White grid squares indicate natural notes (i.e. white keys) and pink squares indicate accidental notes (i.e. black notes). "The Pink Squares" may also be a band we saw open for Quarterflash and the The Go-Go's at Madame Wong's in 1981 (but maybe not).
Time is displayed horizontally with vertical lines indicating time divisions. The number of these lines/note value varies dependent upon current zoom level, but they have no effect upon playback.
Start/End flags- At the top of the grid, these green flags indicate the start and end points of the current sequence. You'll generally want the Start flag at the very beginning of the sequence, but moving it can be useful if you'd like to change the start point of an existing sequence. Since only the area between the flags is active, any grid region to the right of the End flag is green to show that it's inactive.
If Loops Sequence is disabled, playback or recording will stop when the playback line reaches the End flag.
If a note is manually drawn in past the End flag, the End flag location will move forward.
Playback line/flag- The vertical line with a green triangle at the top indicates the current playback position. The playback line can be moved to any location by clicking in the dark gray area above the grid; it will snap to the closest current snap button value (located above the keyboard).
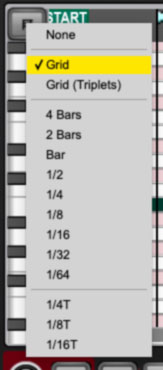
Snap button- The button directly above the keyboard opens the snap value menu. Note durations and locations are rounded to this setting. The icon on the button changes to show the current setting.
-/+ zoom buttons- Use these buttons located at the bottom right of the grid to enlarge or en-small (yep, made that up) the sequence grid view vertically or horizontally.
Scroll bars- These move the view range up and down or side to side. With short sequences (one or two bars) you probably won't need to use them. The Grid setting snaps notes to the currently visible vertical lines, which vary dependent on the zoom setting. Grid (Triplets) does the same, but rounded to the closest triplet value (in case you're creating a wicked waltz or one of those mid-tempo 90s dentist-office jams).
Grid notes- The colored rectangles on the grid represent notes, with note length corresponding to their width.
Grid Note Right-Click Menu
Delete- Erases selected note. Multiple notes can be deleted simultaneously if more than one is highlighted.
Select All- Highlights all grid notes.
Velocity- Sets MIDI velocity. Velocities can be set for multiple notes if more than one is highlighted. Notes drawn into the grid with the pencil tool will default to MIDI velocity 100.
MIDI Channel- Sets note MIDI channel. MIDI channel can be set for multiple notes if more than one is highlighted. Notes drawn into the grid with the pencil tool will default to MIDI channel 1. The MIDI channel of a note is indicated by its color as follows:
MIDI CHANNEL
COLOR
1
light green
2
dark blue
3
medium blue
4
light blue
5
turquoise
6
med green
7
lime green
8
yellow
9
orange
10
red
11
salmon
12
light purple
13
gray purple
14
violet
15
olive
16
blue purple
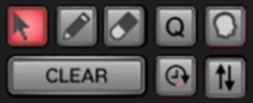
Tool Buttons
Select Tool (arrow) [Z]- The arrow tool is used to move notes by clicking and dragging, or to change note duration by clicking and dragging their left or right edge. Note durations will snap to the value currently selected with the Snap button.
Pencil Tool[X]- The pencil tool is used to create new notes by clicking on the grid. The duration of newly created notes is set with the Note Duration pop-up menu to the left of the tool select buttons.
Eraser Tool[C]- Click on notes with the eraser to... erase them. To erase multiple notes, click and drag over them. Remember that Voltage's undo buttons (the twirly arrows next to the patch preset box up top) can be used if you make a mistake.
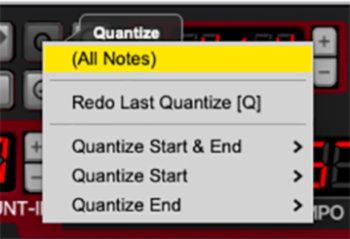
Q / Quantize and pop-up menu- The quantize tool offers a number of powerful quantizing options. Unlike the previous tools it doesn't toggle on and off; it's used by first highlighting or more notes in the grid, then clicking and selected one of its quantize submenu options. The submenu options are as follows:
(All Notes) / (Selected Notes)- This indicates which notes will be affected by quantize operations. If no notes are currently selected, it will display All Notes and the selected operation will affect all notes in the grid. If one or more notes are currently highlighted, it will display Selected Notes to indicate that only the currently highlighted notes will be affected by quantize operations.
Redo Last Quantize [Q]- In the menus beneath, you'll specify the desired quantization parameters (beginning of note, end of note, and quantization note value). Since you'll likely want to use the same type of quantization, Redo Last Quantize saves you from having to repeatedly delve two sub-menus down to quantize.
Quantize Start & End- Rounds the start and end of note(s) to the chosen note value.
Quantize Start- Rounds the start of note(s) to the chosen note value.
Quantize End- Rounds the end of note(s) to the chosen note value.
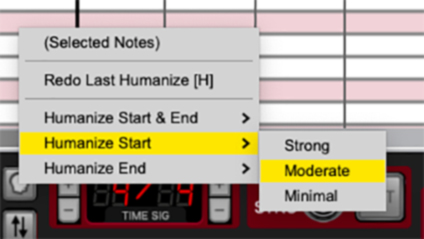
Humanize (head icon) and pop-up menu- The humanize tool is effectively the opposite of the quantize tool - it adds randomness to the timing of a note or notes. Since most of us are pretty darn good at playing imperfectly, humanize is typically applied to perfectly quantized note passages; that is, notes that are sitting exactly on grid lines. Its functionality is almost identical to the quantization options explained above, but instead of note values, it includes options for Strong (a lot of timing variance), Moderate (medium timing variance), and Minimal (very little timing variance). Its submenu options are as follows:
(All Notes) / (Selected Notes)- This indicates which notes will be affected by humanizing operations. If no notes are currently selected, it will display All Notes and the selected operation will affect all notes in the grid. If one or more notes are currently highlighted, it will display Selected Notes to indicate that only the currently highlighted notes will be affected by quantize operations.
Redo Last Humanize [H]- In the menus beneath, you'll specify the desired humanization parameters. Since you'll likely want to repeatedly use the same type of humanization, Redo Last Humanize saves you from having to repeatedly delve two sub-menus down to humanize.
Humanize Start & End- Randomizes the start and end of note(s) to the chosen humanization amount.
Humanize Start- Randomizes the start of note(s) to the chosen humanization amount.
Humanize End- Randomizes the end of note(s) to the chosen humanization amount.
Clear- Deletes the currently selected note(s). If no notes are selected, it will erase all notes on the grid. Again, remember that Voltage's undo buttons (the twirly arrows next to the patch preset box up top) can be used if you blow it and erase everything.
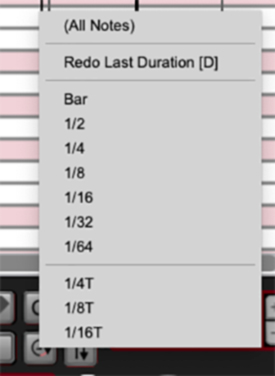
Set Duration (twirly arrow with clock with a dolphin shooting rainbows from its blowhole icon, ok, maybe only the first part)- Allows a note duration to be set for one or more notes simultaneously. The pop-up menu format for this guy is similar to the quantize and humanization buttons.
(All Notes) / (Selected Notes)- This indicates which notes will be affected by setting the duration. If no notes are currently selected, it will display All Notes and the selected operation will affect all notes in the grid. If one or more notes are currently highlighted, it will display Selected Notes to indicate that only the currently highlighted notes will be affected.
Redo Last Duration [D]- In the menus beneath, you'll specify the desired duration parameters. Since you'll likely want to repeatedly use the same type of humanization, Redo Last Humanize saves you from having to repeatedly delve two sub-menus down to humanize.
Duration values- Select these to set note lengths.
Transpose (up/down arrows icon)- Transposes a note or multiple notes by moving them vertically in the grid. Again, the pop-up menu format is similar to the preceding controls.
(All Notes) / (Selected Notes)- This indicates which notes will be transposed. If no notes are currently selected, it will display All Notes and the selected operation will affect all notes in the grid. If one or more notes are currently highlighted, it will display Selected Notes to indicate that only the currently highlighted notes will be affected.
Redo Last Transpose [T]- In the menus beneath, you'll select the transposition interval. Since you may want to repeatedly transpose by the same interval, Redo Last Transpose saves you from having to repeatedly select a value. The T key on the QWERTY keyboard functions as a shortcut for Redo Last Transpose.
Transpose Intervals- Choosing one of these values allows transposition up or down by any value up to an octave.
MIDI Jacks / Panic Button
MPR uses MIDI jacks for all note I/O.
MIDI In- Use this to input notes. Typically this will be patched from the IO Panel MIDI/From Host jack.
MIDI Out- Use this to route note playback to modules. It also acts as a MIDI Thru for incoming data.
Panic Button- The upside-down button with an exclamation point sends a MIDI all notes off message in case anything gets stuck.
Transport Buttons and CV Controls
Play Gate- Outputs a constant 5V gate signal when MPR is in play mode. It's unaffected by note-ons and note-offs.
Play/Stop- Starts and stops pattern playback.
Reset- Sets the playback line back to the beginning of the pattern grid.
Record/Record Quantization- The record button starts the transport and immediately begins recording notes from the MIDI input jack at the current location of the playback line. When pressed again, Might Piano Roll exits recording mode, but will continue to play. To stop the playback, whack ye olde Stop button.
The skinny right-side portion of the button sets record quantization - this automatically quantizes incoming notes to the selected value. The recording quantization button glows red if a note value other than None is currently selected.
Step Record- Allows notes to be manually input. Step recording always beings at beat 1 on the grid. Note duration are length of each step are specified via the Note Duration and Step Length pop menus, respectively. Note size will be the smaller of either note duration or step length. Single-note melodies or chords may be entered in step record mode.
Loops Sequence- Engaging this causes the pattern to repeat from the Start flag when the play line reaches the End flag. Loop Sequence is on by default.
Note Duration- Sets the length for note entered via Step Record mode, or drawn into the grid with the pencil tool.
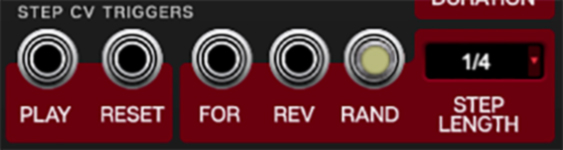
Step Length- Sets the amount of time (in note value) that the play line jumps by when notes are entered using Step Record mode, or when controlling the playback bar using the For, Rev, and Rand Step CV trigger inputs. (See the next section for info on this)
Step CV Triggers
The five grouped jacks at the bottom allow control of playback in various ways via trigger CV's. Trigger CV's are typically 5V, but these jacks will respond to any voltage > 2.5V.
Play (Stop)- Toggles the play and stop modes.
Reset- Resets the playback line to the beginning of the pattern grid.
For (Forward)- Plays from current playback bar position for the length currently set in the Step Length pop-up menu to the right of the jacks.
Rev (Reverse)- The playback bar will jump back by the length currently set in the Step Length pop-up, then play for the length currently set in the Step Length pop-up. Sort of a "jump back and repeat."
Rand (Random)- The playback bar will jump back to a random location and play for the length currently set in the Step Length pop-up. The destination of the playback bar is always be a division of the current Step Length value. For example, if the Step Length value is set to quarter-notes, the playback always lands on a quarter note. The playback bar will always land on even values regardless of its initial location.
Rec Gate
Rec Gate- Enables recording when a gate voltage is present. If the transport is stopped, the gate CV will start it; when the gate CV is removed, the transport continues to play.
Count-In- If set to a value other than 0, when MPR receives a gate signal, it waits the number of bars before initiating recording. You'll most likely want to make sure the play pointer is on an even bar line, or else recording can begin on a funky bar line.
Time Signature, Tempo, Sync Out, Bar and Beat Outs
Sync Out- Outputs a 96 PPQN sync signal when MPR is in play mode. Remember that sync signals are different than gate and clock signals - if you'd like to synchronize something at a steady musical note value, use a Sync Divider module to convert the sync signal to a musical value. (If the timing is a little shifted, patch the Play Gate CV out to the Sync Divider Reset input.)
Time Signature- The grid time signature numerator and denominator can be set using the +/- buttons on each side of the display. The pattern grid line arrangement will reflect the current setting.
Tempo- Current tempo, expressed in beats per minute. The rate is adjustable with the big red knob.
Ext Sync jack and button- Allows control of tempo via an external sync source, such as the IO Panel Transport Sync Out jack or a Sync Generator module when enabled. As mentioned, remember that this input needs a 96 PPQN sync signal, not a clock signal.
Bar and Beat out jacks- These send a 5V trigger pulse at the beginning of each bar and beat respectively; their LED's indicate when a CV is sent. They're handy for turning things on and off or triggering percussion sounds or effects. If you're patching these to the gate input of an envelope generator, convert them to a gate signal (i.e. extend their duration) with a Trig To Gate module.
Interfacing Mighty Piano Roll With Other Voltage Modules
Mighty Piano Roll uses MIDI in and out jacks. MIDI I/O was chosen mainly because it allows support of up to 16 independent MIDI channels - any note in MPR can be assigned to any MIDI channel. This allows a great deal of flexibility with just one instance of MPR.
• The Poly Octave Oscillator is the easiest Voltage voice module to use with MPR: it's polyphonic, it has a MIDI jack for note input, and built-in envelope generator.
• For greater creative possibilities, the best option is to use MPR with poly modules from Cherry Audio and third-party module makers. To convert MPR's MIDI output to poly jack pitch, gate, and velocity signals, use a MIDI To Poly CV module. The MIDI Channel Filter module can also be helpful.
• To play individual monophonic parts, use the Poly CV Converter module to split MIDI note data into four independent pitch, gate, and velocity CV's. Its MIDI Overflow output jack can be used to stack The Poly CV Converter instances for additional channels.
Keyboard Shortcuts
The table below shows all MPR keyboard shortcuts:
QWERTY KEYBOARD KEY
FUNCTION
Z
select tool
X
pencil tool
C
eraser too
A
select all
Q
repeats last quantize operation
H
repeats last humanize operation
D
repeats last duration operatio
T
repeats last transpose operation
Selection
ACTION
FUNCTION
Drag on the timeline (above grid)
selects time region - hold [SHIFT] to inhibit snapping